Toyota A340E Control
There
are a few different version of the Toyota A340E transmission, but this
break down will cover the most common 2JZ-GTE version found in the USDM
MK4 Supra. Even then, there are still a few version of the USDM MK4
Supra A340. If you have farther questions regarding a specific A340,
please submit a support ticket
Transmission Wiring
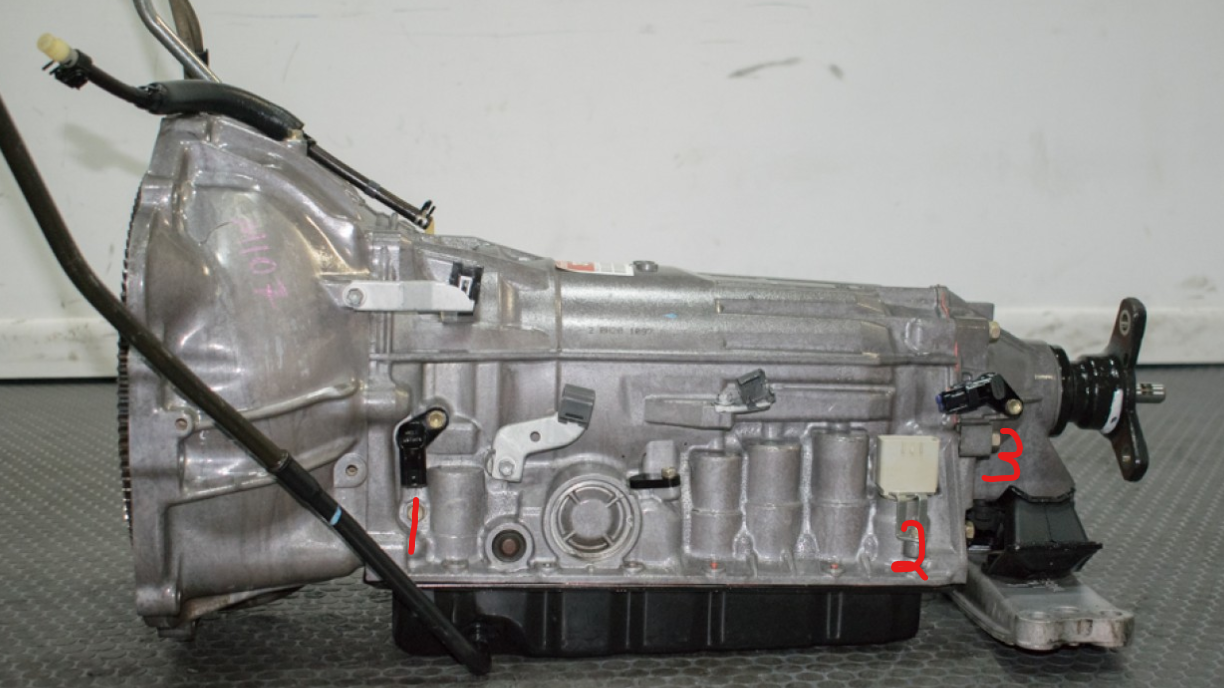
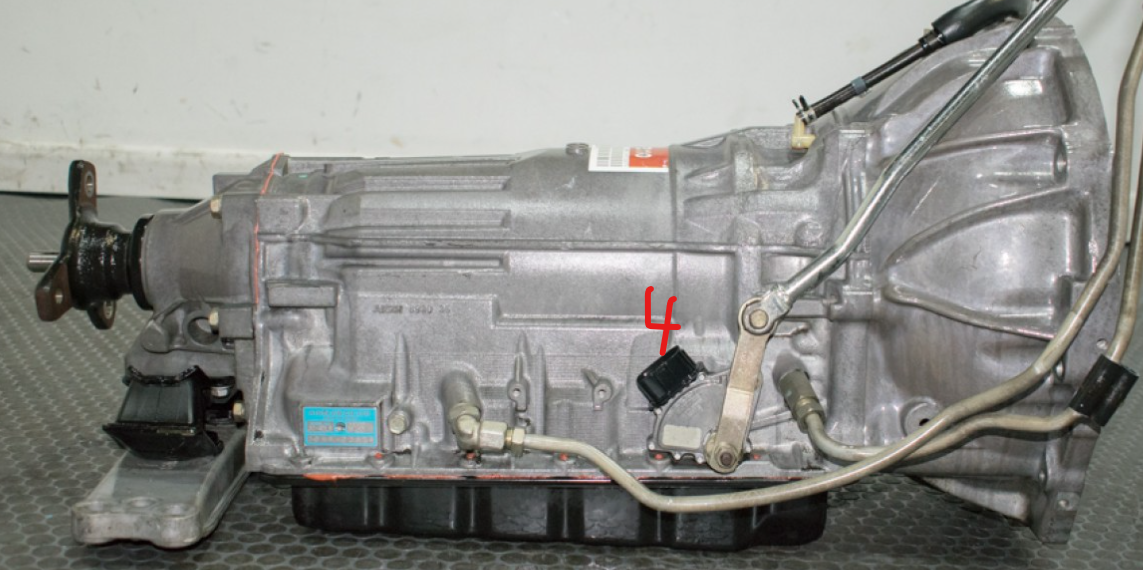
These transmission have 4 plugs, 3 on the drivers side, and 1 on the passenger. (referencing LHD cars)
1 - Direct clutch input speed
2 - Main valve body plug
3 - Output shaft speed
4 - Transmission PRNDL switch
These
transmission do not have a line pressure sensor, but it is recommended
to add a aftermarket one when trying to control with a standalone ECU.
We offer a 250psi pressure sensor that will work well here.
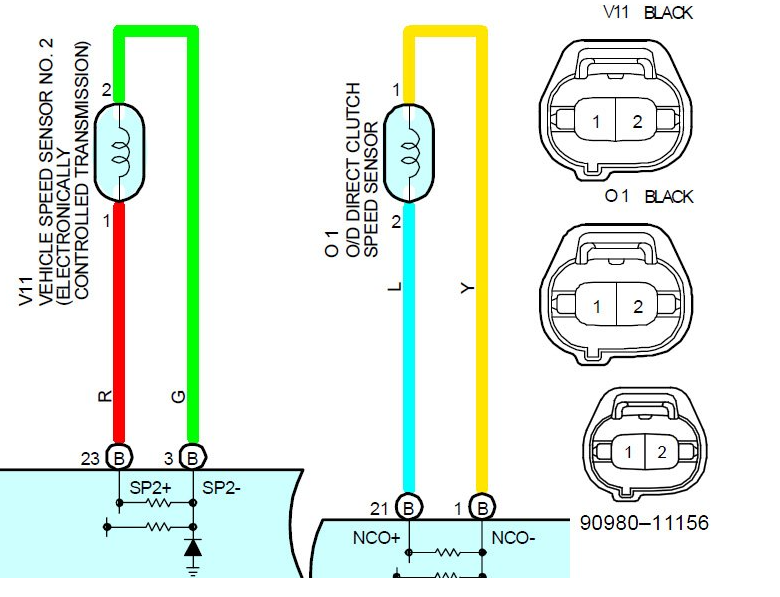
Speed sensors
The
speed sensors are 2 wire VR style sensors, these both can be used if
you have the open IO, but just the rear speed sensor is needed for
vehicle speed.
The front direct clutch input is
listed as NCO by Toyota, the rear speed sensor is listed as SP2. These
will both use SPI inputs to the Haltech.
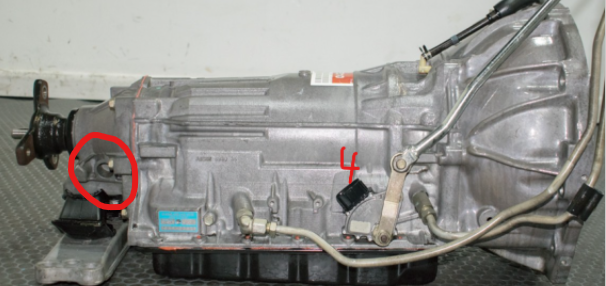
There
are some models that have a 3rd speed sensor that is located on the
right rear of the transmission, I will attach a image below.
It is a hall effect sensor and is used to drive the OEM cluster. You do not need this when wiring the A340 to the Haltech.
Valve Body
The main valve body plug can be a 8 pin or a 10 pin depending on the year. I will go over both here.
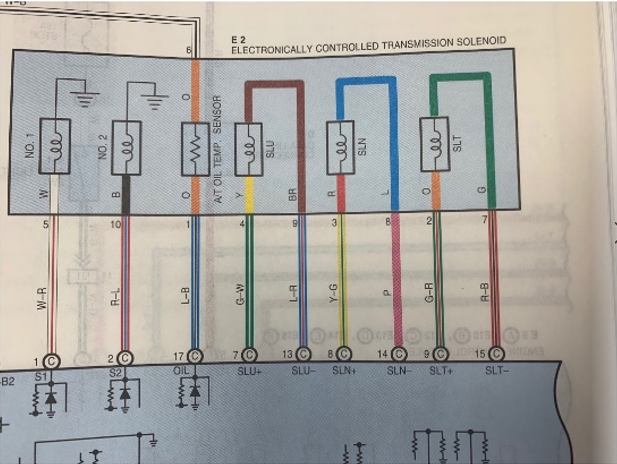

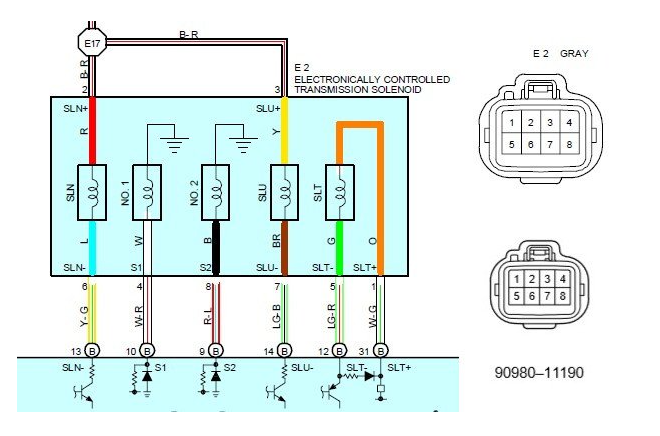
These
all have special terminology from Toyota to describe the individual
pins and their functions. Both connectors have all the same pins and
functions minus the 8 pin connector missing the transmission temp
signal. This can be a separate connector on some.
SLU : Torque Convertor Lockup
SLN : Accumulator Pressure Solenoid
SLT : Line Pressure Solenoid
S1 : Solenoid 1
S2 : Solenoid 2
For the wiring to the Haltech, it is pretty straight forward.
You
will need 2 high side outputs for the S1 an S2 shift solenoids. These
pull 1 to 1.5 amps, so if you have a Elite 1500 or 2500 you can use the
DBW outputs to drive these solenoids directly. If you do not have those
outputs available you will need to use low side DPO's to trigger relays
to power those shift solenoids.
The torque
convertor lock up solenoid, line pressure solenoid, and accumulator
solenoid are all ground side switched, so any open DPO, or unused
injection output will work fine here.
If
your transmission has the internal oil temp sensor in the valve body,
you will use any open AVI and a pull up resistor in the software to read
the internal transmission temp. There are some A340's that have the
temp sensor external with its own 2 wire connector. You can wire that
one the same way if you want.
You can also add a aftermarket temp sensor to the transmission pan if you want as well.
PRNDL Switch
This
is responsible for telling the ECU which gear you have selected on the
shifter so it knows what gear to command the transmission to be in.
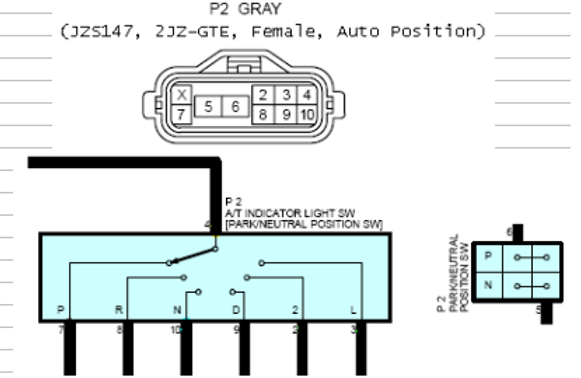
These
wires are all 12v switched and can be wired to any open input on the
Haltech, but this takes up 6 inputs and is often not ideal. There
are companies that offer a PRNDL switch that converts all 6 signal wires
into one signal so you can save inputs though. Next Level
Motorsports offers a A340 gear position convertor for this.
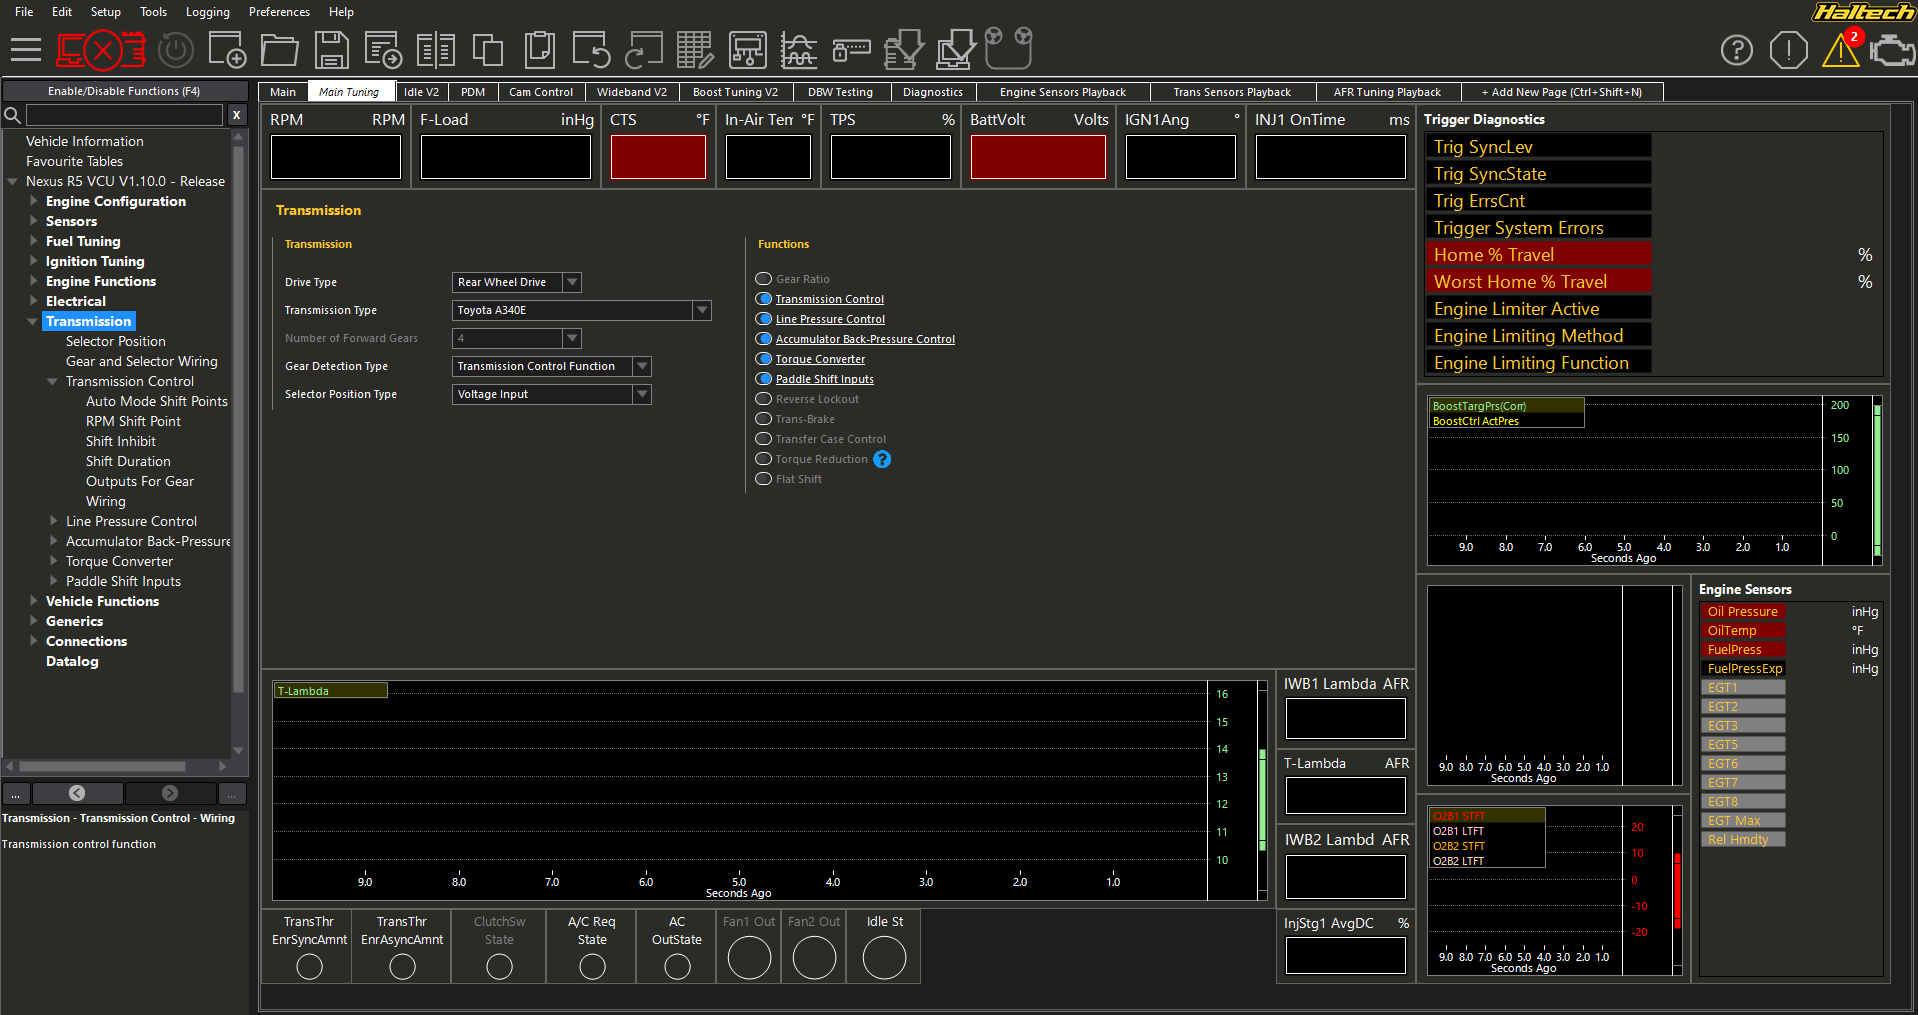
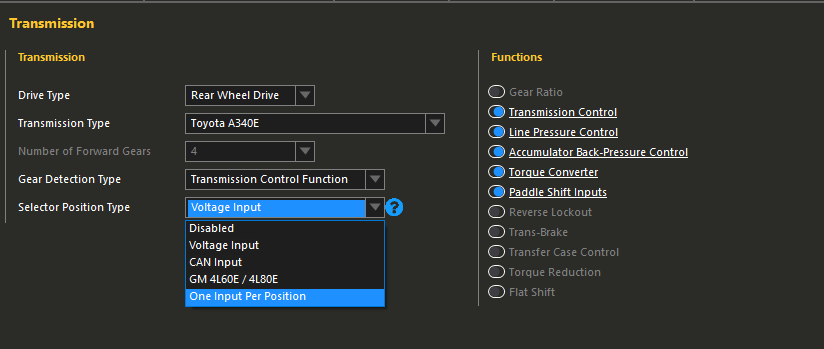
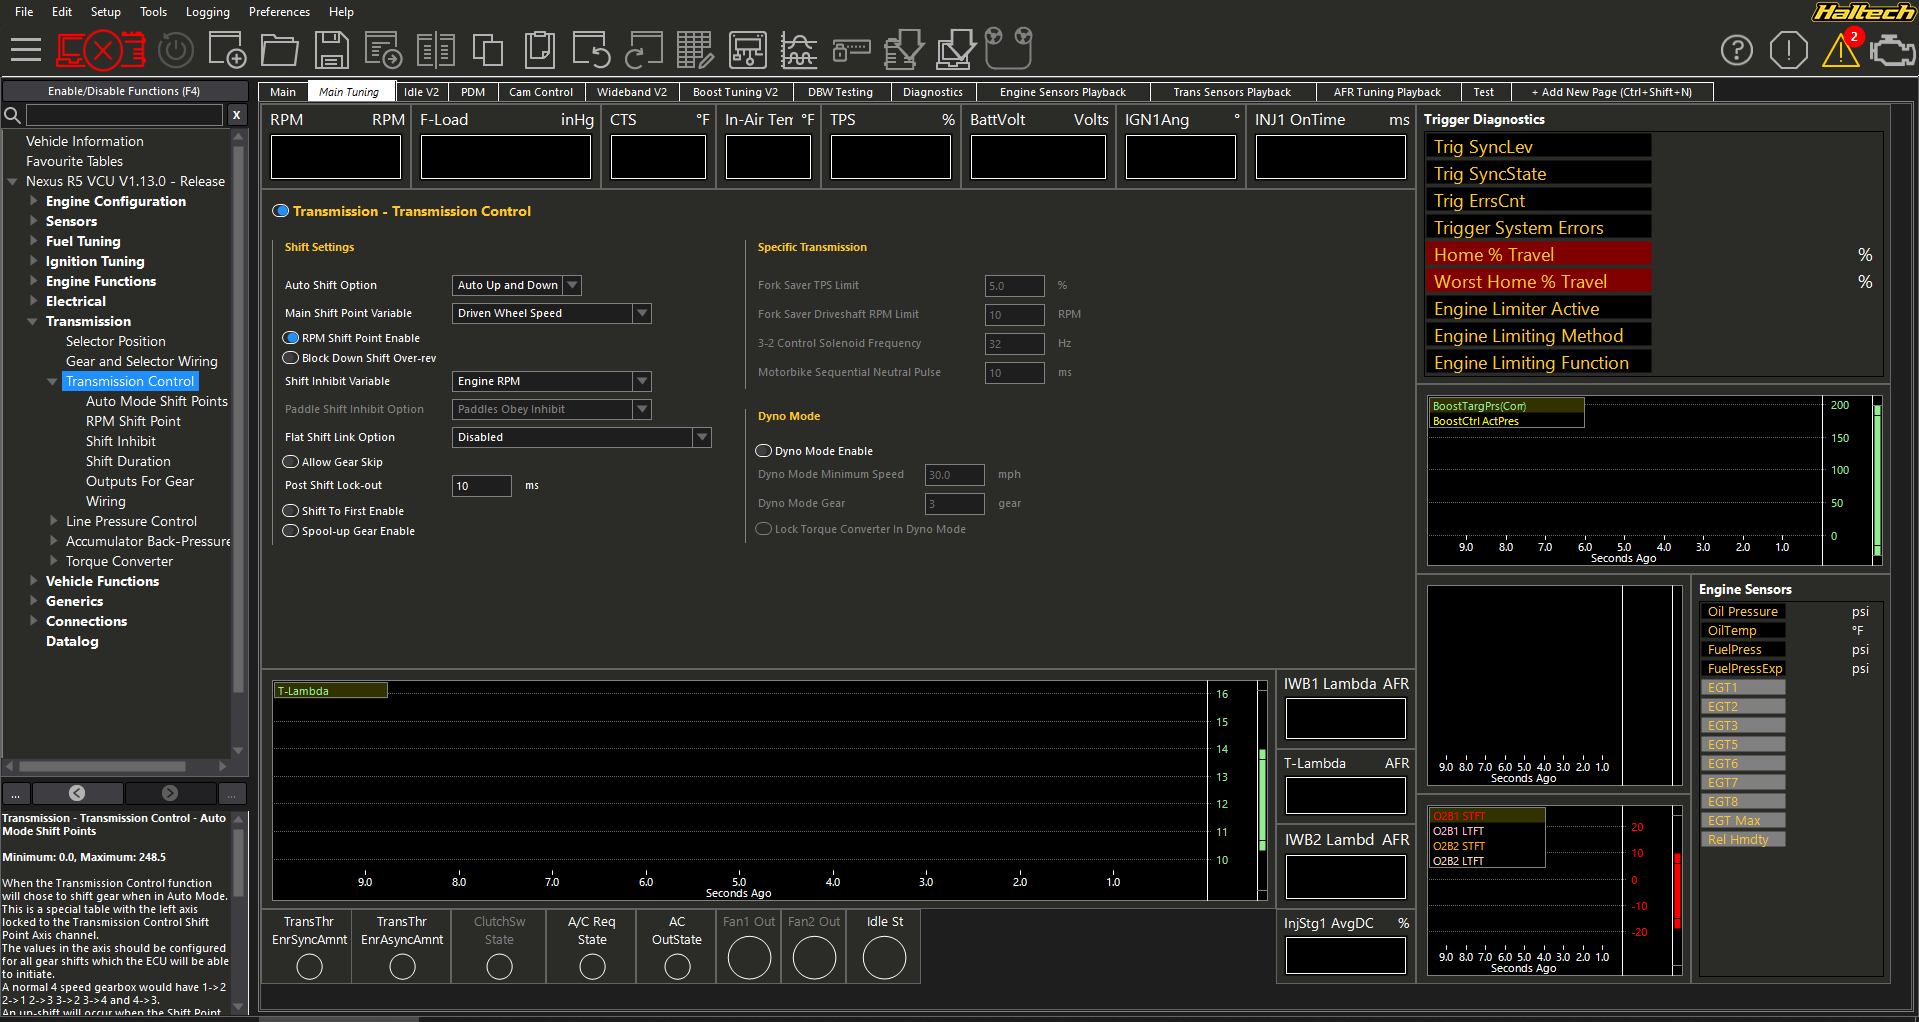
Transmission Tuning and ECU Setup
Selector Position
Now
that you have the wiring done for the transmission, it is time to open
up the Haltech NSP software and get the tuning side complete. Start
selecting the "Transmission" node in the ECU navigation tree on the far
left side of the tuning software. You will want to select the following
settings:
If
you are using direct inputs from the PRNDL switch, instead of a signal
convertor, you will want to change the selector position type from
"Voltage Input" to "One per position"
Like so:
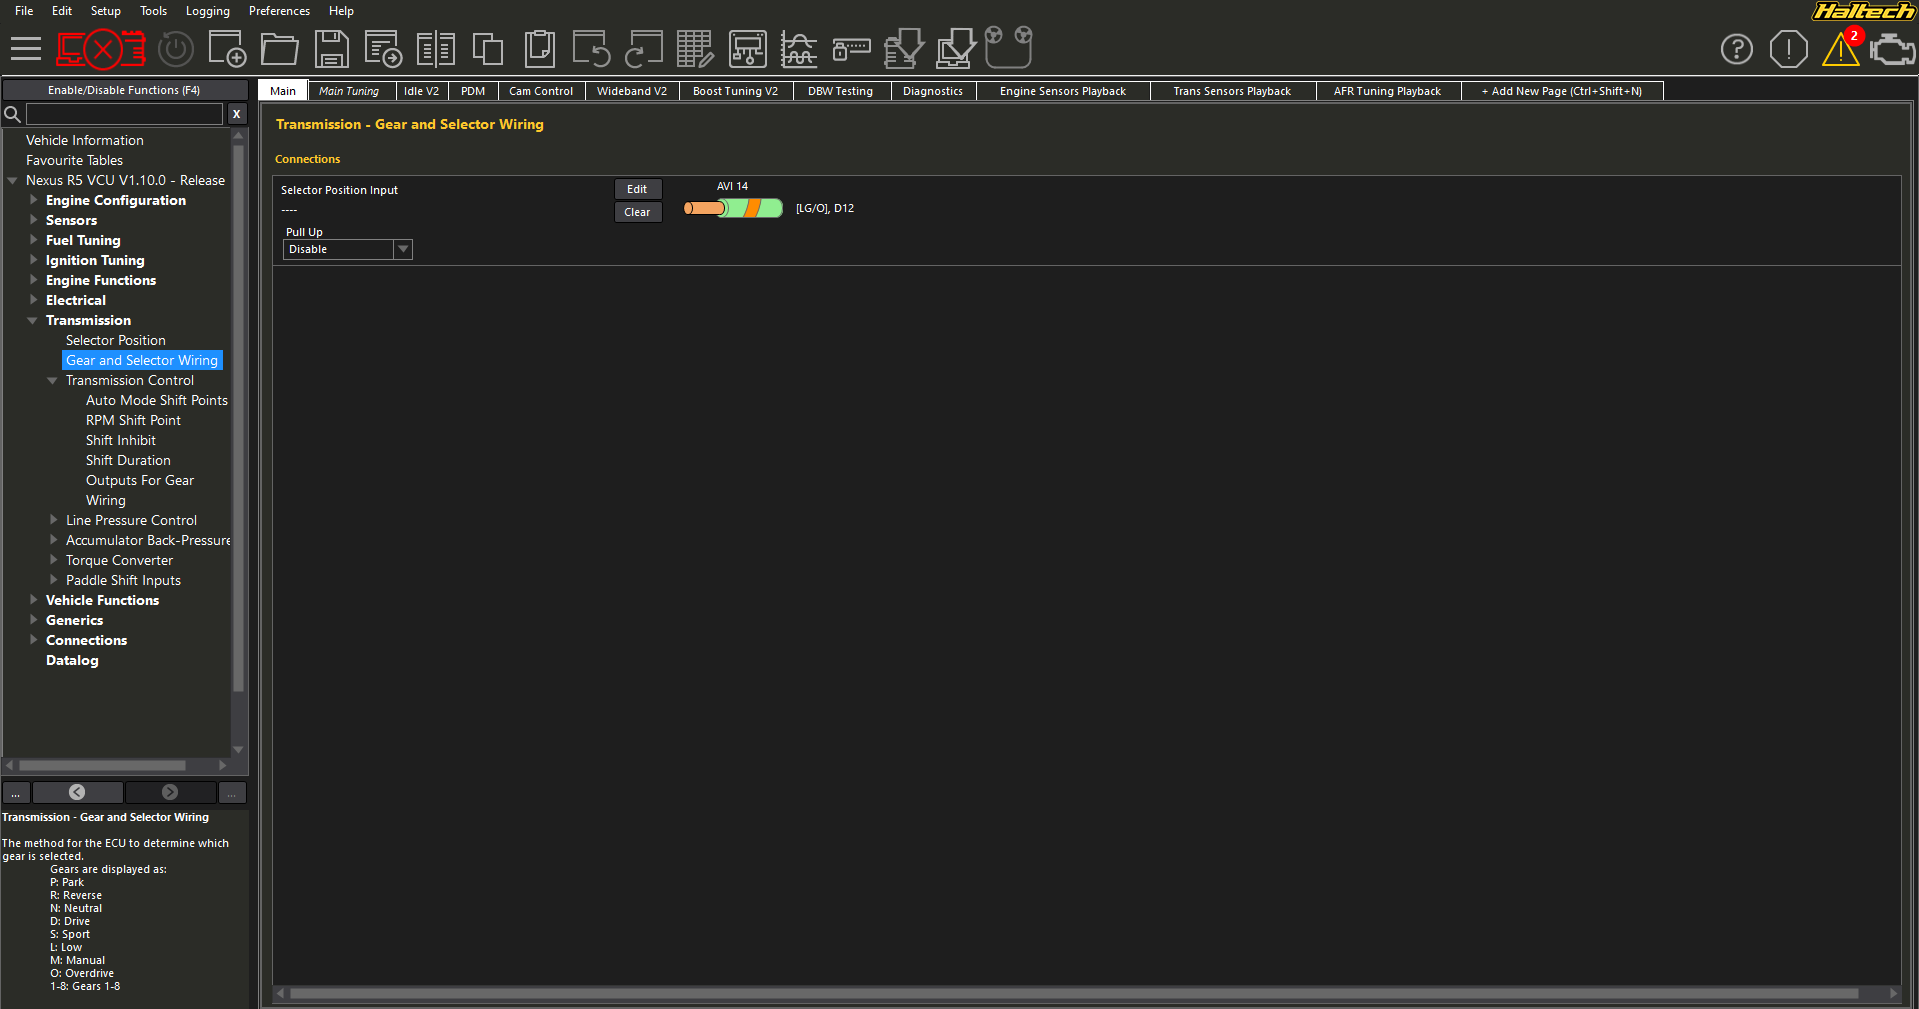
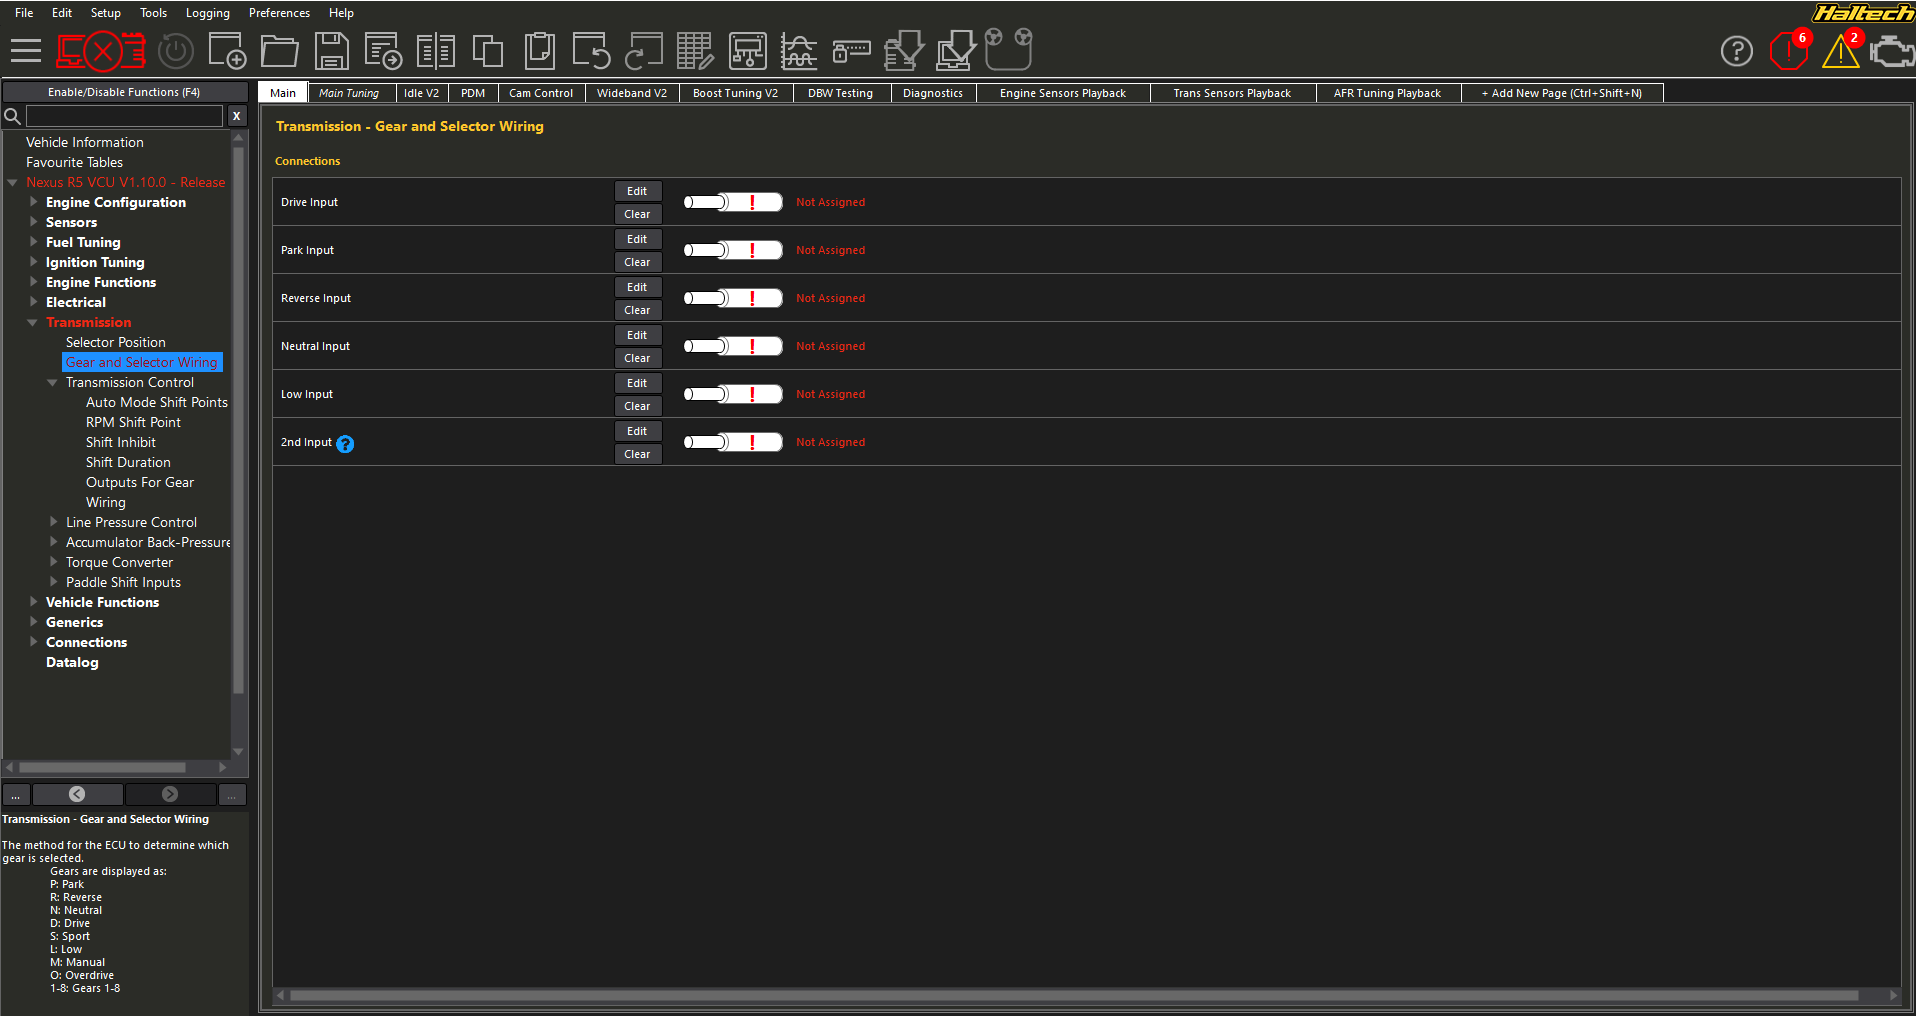
Once
you have selected your selector position type, you can go to the wiring
tab and assign the wires you used, again the signal convertor uses one
input and without that you will need to use 6.
If you are using a signal convertor, you will follow the next step to get your ECU reading your shifter position.
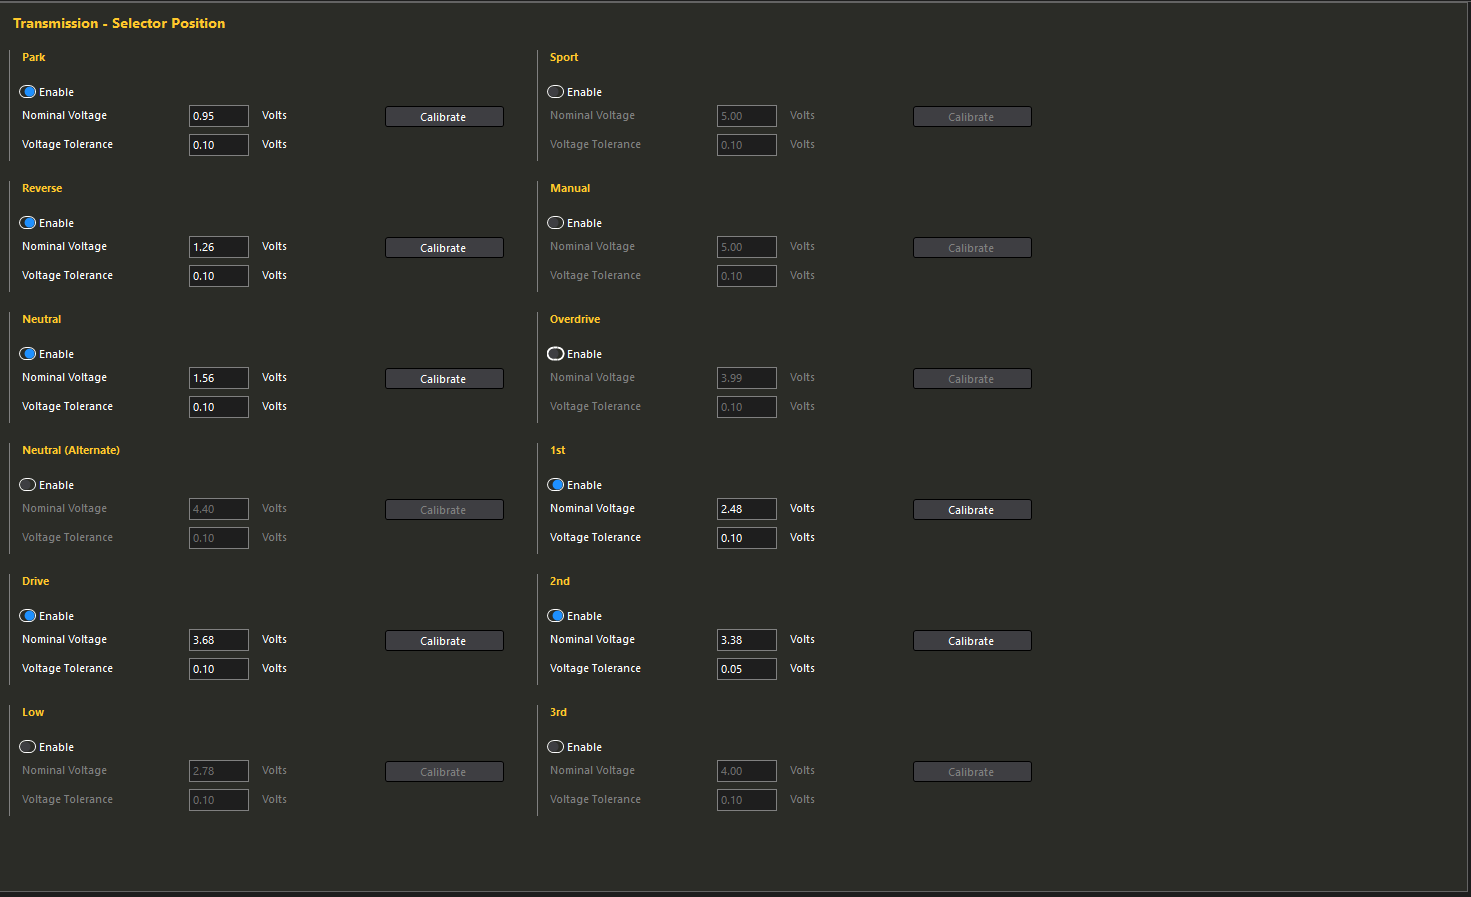
Now
select the "Selector Position" tab in the ECU navigation tree. If you
are using a signal convertor you will have a voltage and tolerance per
position. Turn on all the position you are using, in the A340E there is
park, reverse, neutral, drive, 2, and low (or 1). Once all these are
turned on you can go through all the position on the shifter and
calibrate the voltage reading per position. It will look like this, note
your voltages will be specific to your signal convertor.
This
should take care of the PRNDL switch set up to the Haltech ECU. To test
you can open a number display in the NSP software and select "Gear
Selector Position" and this should read what gear you select on the
shifter itself.
Transmission Control
I
will go over the basics to get a A340E up and running, but there are
TONS of other features you can add to your control strategy if you want.
Start
with your "Transmission Control" node and select the following options.
This will cover the basics on how you want to control the auto shift
tables.
Next go down all the sub nodes under "Transmission Control" and use the following information:
Auto Mode Shift points
- This is the table the tells the transmission when to shift. This
table is based on engine demand and gear, the table value is MPH. This
can be changed if you want, but this is the easiest way to tune in my
opinion. The Y axis is the gear change, so 1->2 would be the 1st to 2nd up shift, and 2->1 would be the 2nd to 1st down shift.
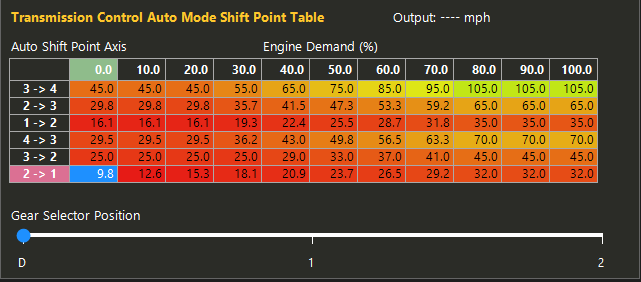
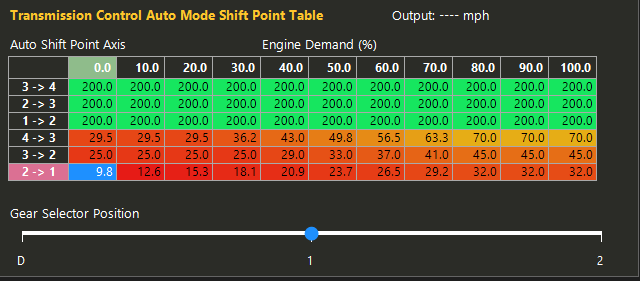
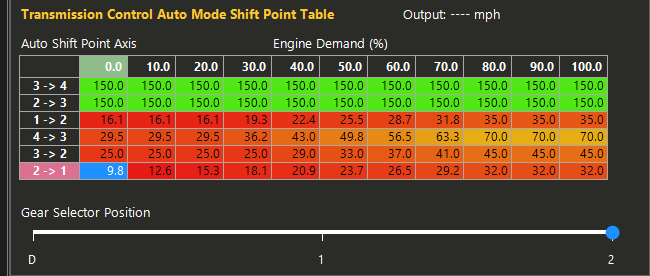
When
you are tuning the shift points for 2 and the low (1) setting, you will
just stop the ECU from shifting to those gears using the 4D tuning axis
on this table.
This is done
by selecting the cells for the upshift you are trying to prevent and
maxing them out. The ECU can still make the shift if you reach the RPM
shift point setting detailed below, but this would only happen if you
hit the limiter set below.
If
you are using a manual mode with paddle shifter, or a sport mode where
you have more aggressive shifting strategy's, you would add both those
options to the 4D on the auto shift point table and tune them according.
Not all add this on the A340's, but if you are interested email in to USASupport@Haltech.com and we can help!
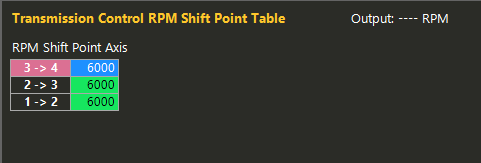
RPM Shift Point -
This is a fail safe so you do not over-rev the car if your auto shift
point table is set up incorrectly. This can also be used as a WOT shift
table.
Shift Inhibit - This
will stop a shift from happening. Most commonly it is used if you are
using manual mode with some paddle shifters and you want to prevent the
transmission from down shifting if the RPM's are too high in the gear
you are in. This information is figured out per car since different
ratios can change the allowable down shift RPM. When in doubt, set it
low and work your way up.
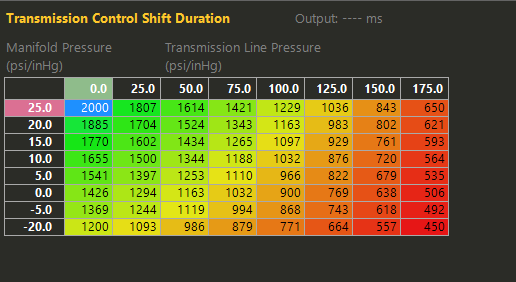
Shift Duration
- This is how long the transmission takes to shift from gear to gear.
The ECU uses this information to help with line pressure control during a
shift. The rule of thumb is start with larger numbers if you are unsure
how your transmission shifts. You can log transmission control
shift progress to see when the shift is started and then look at RPM to
see when it drops and settles into the next gear to figure out the time
it takes to complete the shift if you are wanting to figure out the
exact data needed for this table.
Output for Gear - This is not used when you select a specific transmission in the main transmission setup page.
Wiring
- This is where you assign the outputs you used to control the 2 shift
solenoids in the A340E. They are high side, so make sure the output you
used is set to high side and able to supply 1.5 amps.
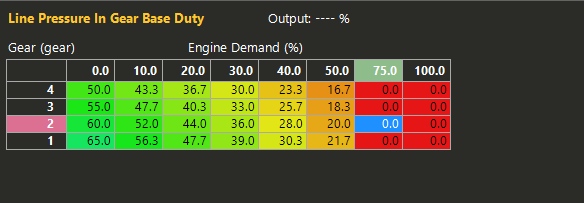
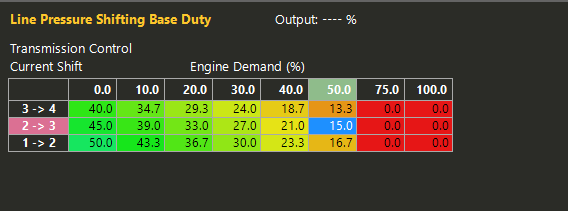
Line Pressure Control
This
function is used to control the line pressure of the transmission while
in gear and during the shift. This will aid in keeping your A340E alive
with added horse power from your engine.
You
do need to be careful though since too much line pressure will make the
shifts harsh when you are just cruising around and not enough line
pressure can make the transmission slip.
There are 3 types of control in the Haltech for line pressure, I will go over the most basic, open loop.
If you are wanting more information on the other tuning methods, please refer to this link - https://support.haltech.com/portal/en/kb/articles/line-pressure-control
For
open loop you are just setting the duty cycle you want to pulse the
solenoid at, and nothing more. This is the most basic, but it is
effective.
The A340E frequency
is 300hz and it is a bleed style solenoid, so 100% DC would bleed off
as much line pressure as possible and 0% will bleed off no line
pressure.
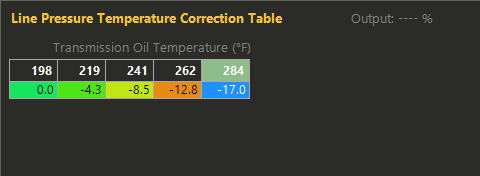
There are tables for in gear, shifting and a correction table for fluid temp. Rule of thumb is for higher horsepower, you will want more line pressure.
Here is a basic table to give you a idea on it can be set up.
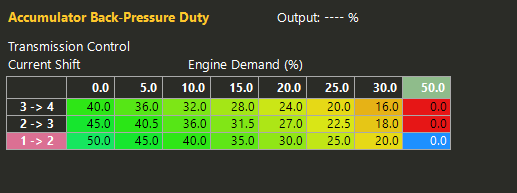
Accumulator Back Pressure Control
This
is something I have not seen a huge benefit in using with the A340E
transmission. The accumulators job is to help soften the shift when
going from gear to gear, but with the line pressure shifting table, it
is a little redundant. I will still provide a example table so you can
see how it should be set up. The solenoid use a 300hz frequency and it
operates in the same fashion as the line pressure solenoid with 100%
being the most amount bled off, and 0% being no line pressure bled off.
Torque Convertor Lock
This
is going to be used when you are in 4th gear and cruising. You DO NOT
want to lock the convertor when you are under a heavy load and making a
lot of power.
Here are basic setting to start with for the A340E
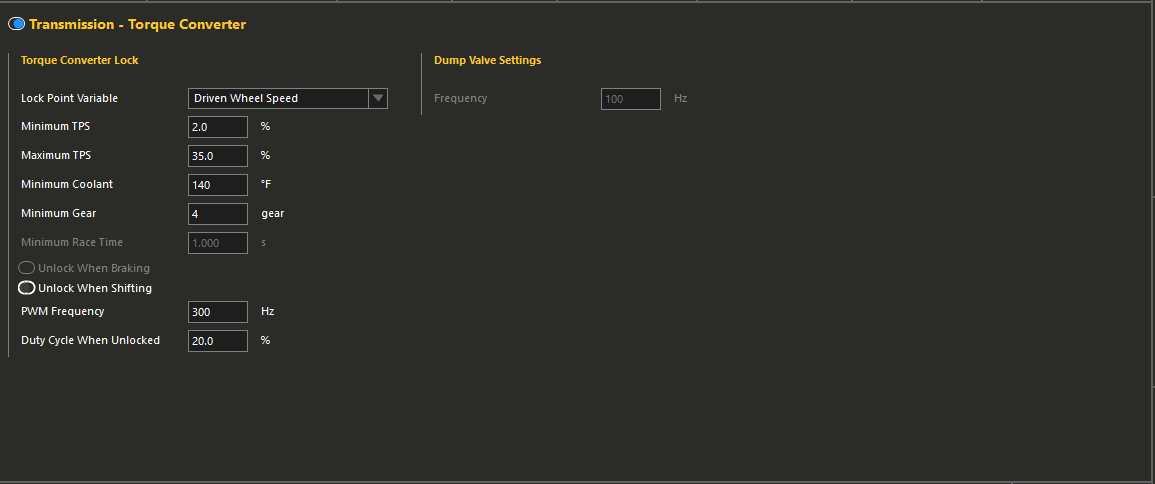
The
lock point is the MPH you will lock the convertor at once you have met
all the other conditions. It will be determined by what MPH you are
typically cruising at in 4th gear. 45 MPH is a safe place to start, but
can be adjusted depending on your gearing and tire size.
The
unlock point is the MPH you unlock the convertor at if you are still
meeting all the conditions, but slowing down. This is usually set 5-10
MPH lower than the lock point setting.
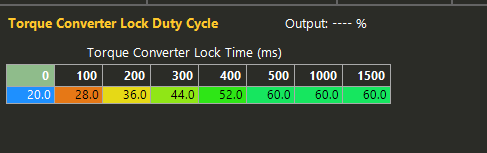
The lock duty cycle is PWM output to the solenoid to keep the convertor locked and not slipping. Here is a good place to start.
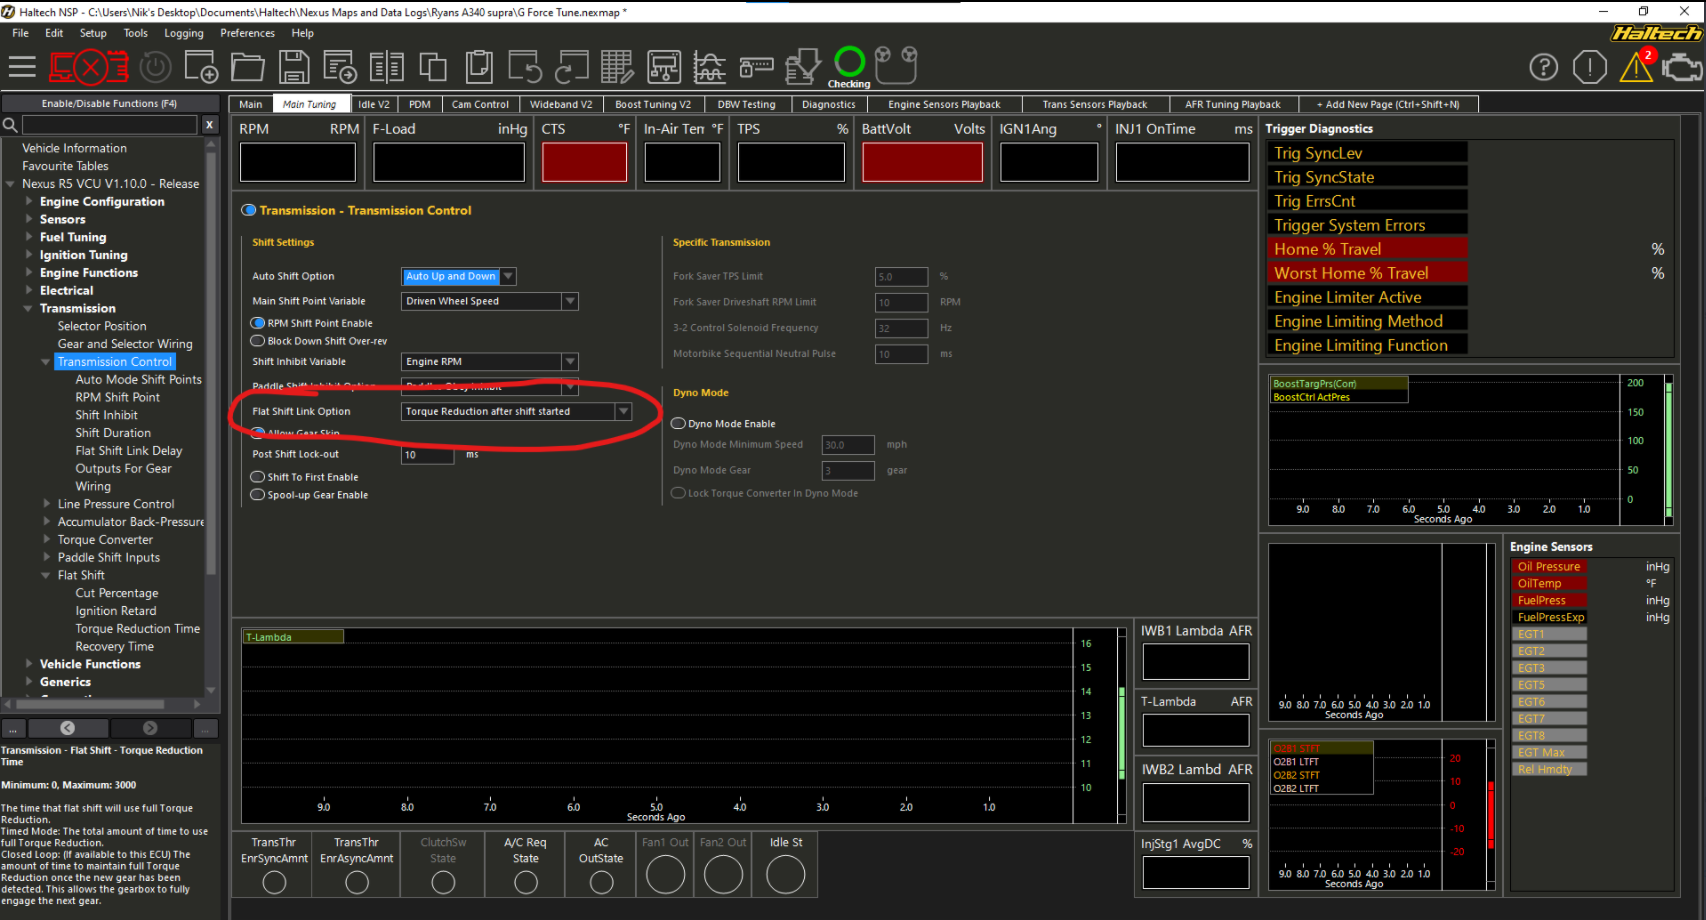
Flat Shift
You
will not use flat shift active time since you are a auto and the flat
shift function will be triggered from the auto transmission control
function already.
Here is the run down on how it is linked and works.
First
we have the flat shift link option, this tell the ECU you want to use
flat shift with your auto transmission control, and if you want it to
start the cut before or after the shift has start and if you want to use
throttle blip.
Start the cut after the shift has started for a A340E.
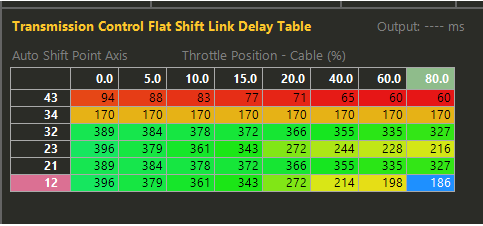
Next
we have the flat shift link delay. This is the time it takes from when
the shift is commanded, until the shift is actually completed. This is
set by logging the shift request and then watching for when the RPM
drops into the next gear. Here is some reading for this - https://support.haltech.com/portal/en/kb/articles/flat-shift-link-delay
This is a table for a A340E with a shift kit, these number will be larger with the stock valve body.
Next you are going to the flat shift settings. You will need to pick the flat shift mode, either timed or while active.
Timed
give you a table to tune that lets you set the amount of time you want
based on whatever axis you want, RPM and TPS are common here.

While
active follows the transmission control flat link delay table and uses
the values you set there to determine how long to keep flat shift
active. You will need to make sure that your trigger option is set to
"triggered by transmission control function" for this to work properly.
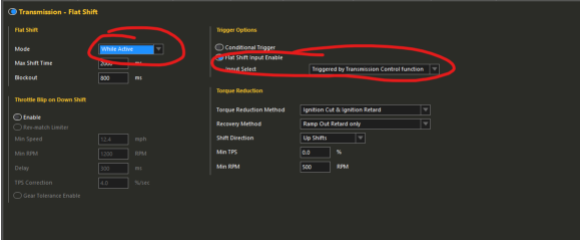
For
the torque reduction settings, you can pick what kind of cut you want,
the recovery method, shift direction, and some conditions for when it is
allowed to work.
I recommend and ignition cut and retard and ramping them together once the cut is over. This is the smoothest option I fell.
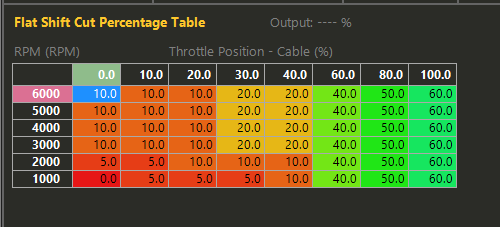
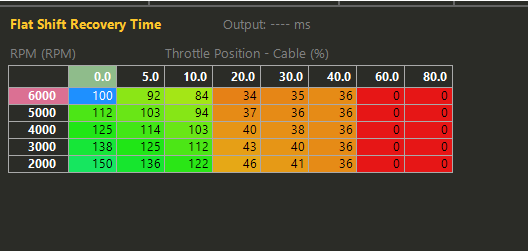
Lastly we have cut percentage, ignition retard and recovery time tables.
The
cut percentage is going to be the amount of cylinders you want to cut
for the time requested from the flat shift link delay, or the flat shift
torque reduction time, depending on your settings.
These tables can be mapped over RPM and TPS, Engine demand, flat shift active time, etc.
The
ignition retard is the same concept as the cut, but it is just removing
timing instead of removing the ignition event all together.
The
recovery time is how long the ECU takes to ramp the cut and retard back
to the normal commanded ignition timing. If you remove the cut and
adding the timing back instantly, you will get a harsh shift and can
damage the transmission over time. Typically at WOT you will feed the
cut and retard back instantly, but for cruising it is done over time.
That
is a general overview of the A340E transmission and some base setting
to get you up and driving before you get to dialing in the transmission
control. If you want to read more about the Haltech transmission control
function and setting, please have a look at our Haltech Knowledge Base.
There are tons of articles and explanations going over all the
transmission control functions.
I will like the Knowledge base below.
Updated: 8 months ago